


With a single formula. Every projector has a projection ratio, often called the throw ratio. This is a dimensionless characteristic of the lens that tells you how much projection distance the device needs per meter of image width. You don't need any more basics than that for the calculation.
Distance = Image width × Throw ratio
A device with a value of 1.5 placed exactly three meters away will produce an image two meters wide. It works the same way in reverse: if the space is fixed, divide the distance by the throw ratio to get the maximum image width. At a distance of four meters, a standard projector will produce a 2.66-meter image, or 120 inches.
Important note for measuring: The projection distance is measured from the lens, not from the back of the housing. With large devices, this can easily make a twenty-centimeter difference, which is exactly what you'll end up missing in the room.
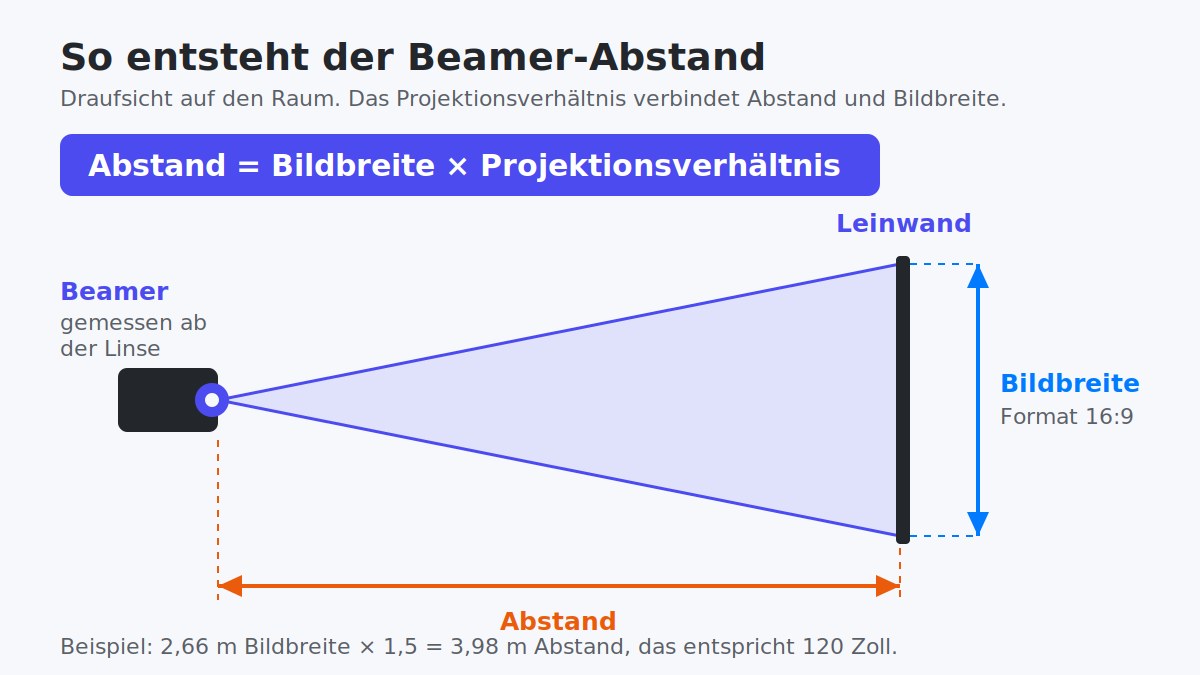
An example of distance calculation: A 120-inch screen is 2.66 meters wide. With a value of 1.5 from the manufacturer's data, this results in a projection distance of 3.98 meters. If your data sheet shows a range like 1.48 to 1.62, calculate both ends to get the corridor in which the projector can be placed.
All values are for the 16:9 format, measured from the lens to the screen surface. Find the row for your screen width and the column for your projector type. The table covers common combinations of image widths and projectors; for intermediate values, use the calculator above.
120 inches is the most common size for events. A tripod screen of this size covers a room with about 60 spectators, and it works just as well for an open-air cinema in the garden.
Inches always describe the diagonal, never the width. This is the most common confusion during planning, as the width is significantly smaller than the inch size might suggest.
Conversion for 16:9: image width in centimeters equals the inch size multiplied by 2.21. You need the area when determining the required light output. This table replaces several tools that are usually found separately elsewhere: it is a distance calculator, image size calculator, and projection calculator all in one.
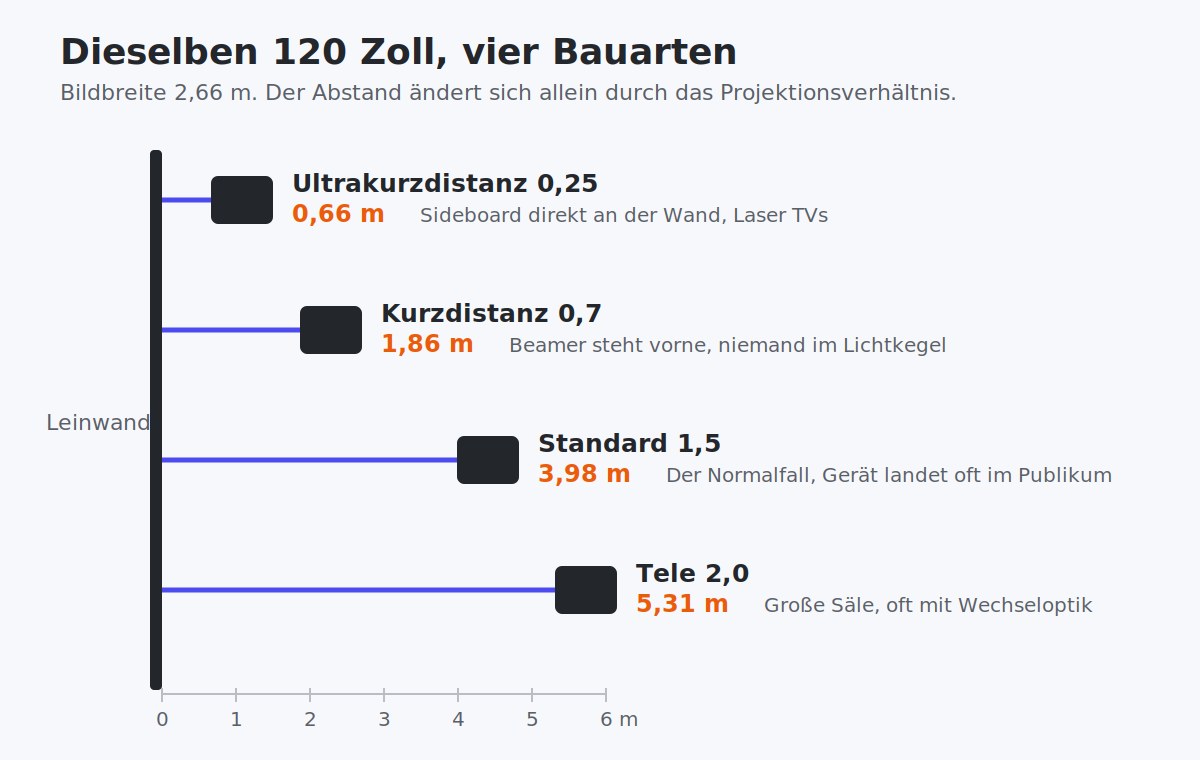
You can find this value in the data sheet under projection ratio, throw ratio, or projection distance. If you can't find it there, take a look at the manufacturer's technical specifications. And if that doesn't help, simply categorize your model by its design type; for planning purposes, that is usually more than enough.
The design determines whether the projector is placed in front of or behind the audience. For an event, this is more important than any brightness value.
The seating distance depends on the resolution, not the projector size. With Full HD, a viewer can see the pixel structure up close; with 4K, the same seating position can be significantly closer. Therefore, plan the seating together with the screen size, not based on it.
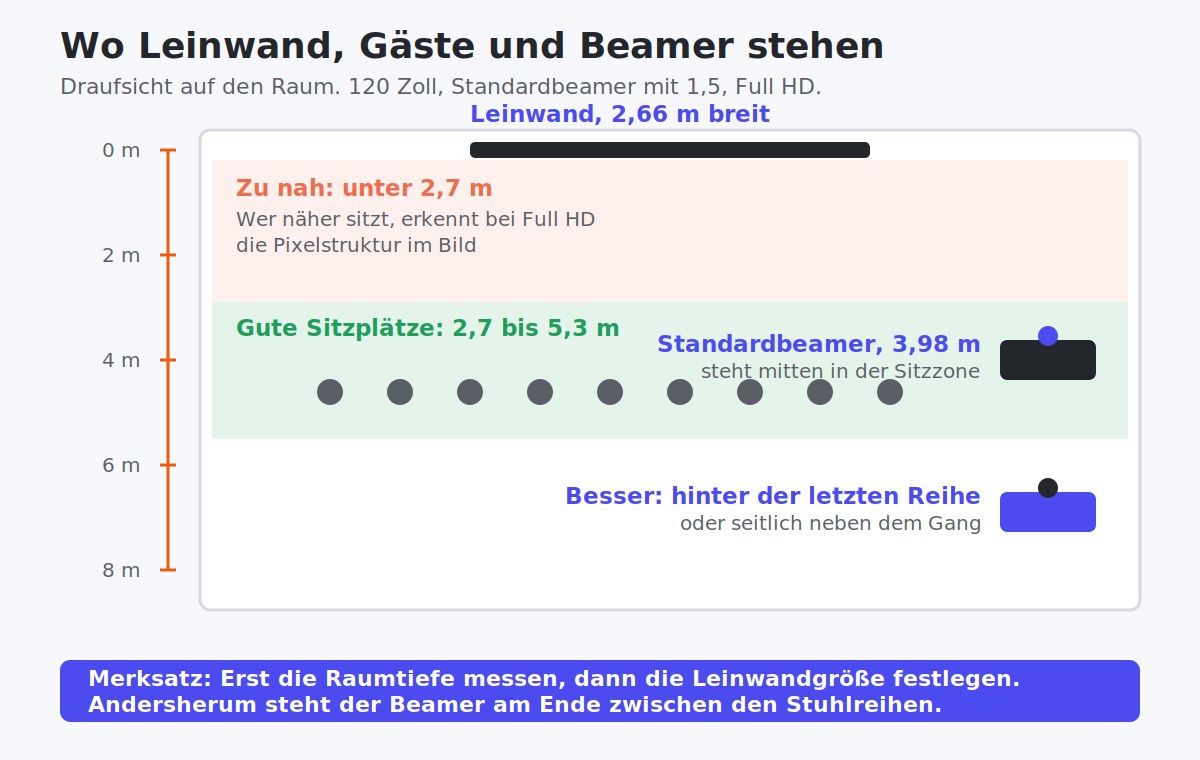
The values follow the rule of thumb of 1.5 to 2.0 times the image width for Full HD and 1.0 to 1.5 times the image width for 4K. If you prefer to calculate using the screen diagonal, you get approximately 1.3 to 1.7 times for Full HD. The SMPTE recommendation of a 30-degree viewing angle is about 1.8 times the image width, while the stricter THX recommendation is about 1.2 times. Conference rooms have their own rule: the smallest text on a slide must be legible from the back row, which usually limits the distance sooner than the resolution does.
Almost every projector has a zoom lens, and its factor determines how far you can move the device without changing the image size. A factor of 1.1 means ten percent leeway, while a factor of 1.6 provides sixty percent. This is exactly why many manufacturers state the throw ratio as a range rather than a single number.
That sounds like a minor detail, but in a hall, it is the difference between a relaxed setup and a hectic one. The Acer H6542BDi has a 1.1x zoom and a throw ratio of 1.48 to 1.62. For an image 2.66 meters wide, this means the projector must be placed between 3.94 and 4.31 meters away, giving you only 37 centimeters of leeway.
From experience: In the thousands of events Renty equips every year, these exact 37 centimeters are the reason why the projector so often ends up in the middle of the audience. If you set up the screen at the front and then realize the device needs to be four meters away, you are forced to place it between the rows of chairs. Therefore, measure the room depth before choosing the screen size, not after.
Almost all online distance calculators are designed for a fixed home cinema: projector on the ceiling, screen on the wall, set it up once and you're done. In rented venues, none of these assumptions hold true, and the four points below are the reason why a calculation from your living room often fails in a large hall.
The projector is on a table or tripod, not the ceiling. This puts it at head height, and anyone walking to the restroom will cast a shadow on the screen. If the distance allows, the device should be placed behind the last row or to the side of the aisle.
The screen size is fixed in advance. With a rental tripod screen, you already know the dimensions when you book. You don't calculate forward, but backward: the screen is set, so where does the projector need to go, and does that fit in the room?
The cable run matters. At distances over eight meters, a standard HDMI cable becomes unreliable; you will need an active cable or an amplifier. This should be part of your planning before the evening begins, because in a conference room, the source is almost always at the front lectern and the projector is at the back.
There are no walls outdoors. In the garden, the screen stands freely, and the projector needs the same distance as it does indoors, just without the furniture you might otherwise use to secure it. How to set this up properly is explained in the guide for garden screens.
A projector does not project straight ahead, but with an offset. This displacement is called the offset and is expressed as a percentage of the image height. With a value of 132 percent, the bottom edge of the image is significantly higher than the lens height.
In practical terms, this means: if the projector is on a table, the image automatically lands higher up on the wall. This is intentional, as that is exactly where the projection surface is located on a tripod screen. A projector on the floor, by contrast, would cast an image that sticks to the ceiling. These details are usually at the very end of the data sheet, but they are more important for the setup than the entire first page.
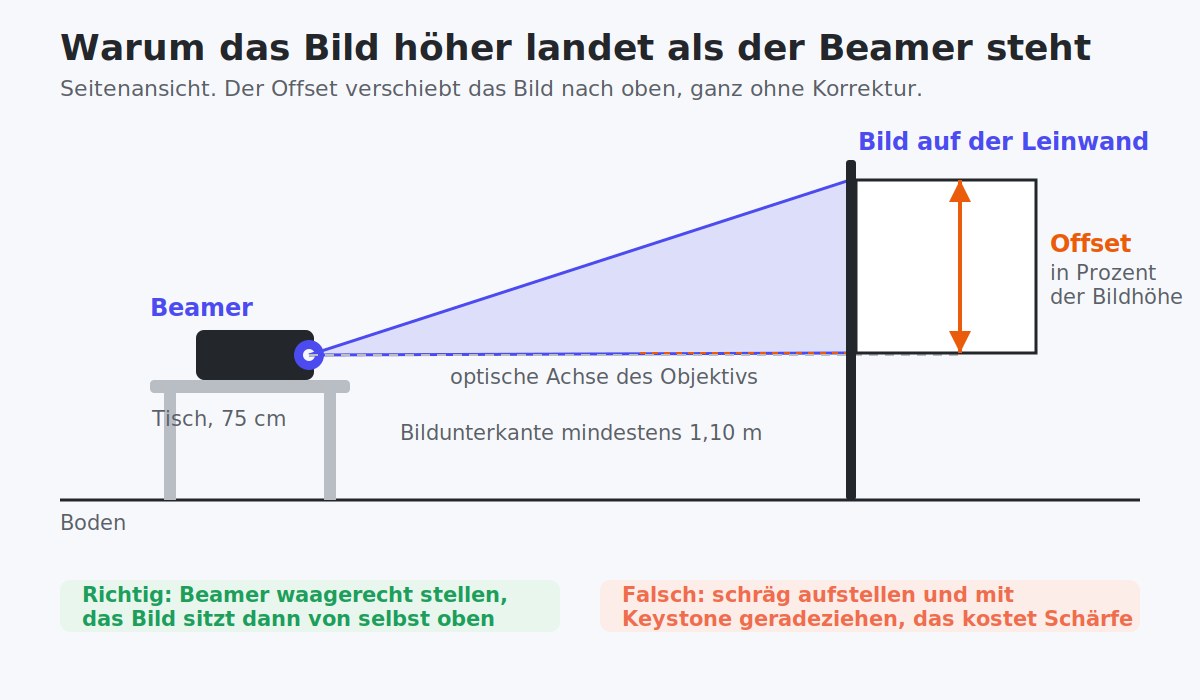
Image sharpness isn't just about focus. In addition to the device's resolution, a properly focused lens, and a correctly used lens shift, it depends on how accurately the projector is aligned with the screen. If it is tilted, one side of the image will be blurrier than the other, and no focus ring in the world can fix that.
Keystone correction is a last resort, not a plan. It calculates a rectangular image from a skewed one, but it costs you resolution and sharpness at the edges. It is better to align the projector horizontally and centrally to the screen and only use the leveling feet for minor adjustments. Larger devices have a lens shift instead, which optically shifts the image without compromising quality.
Always whenever the room is shorter than the calculation allows. A short-throw device with a 0.7 ratio projects the same 120-inch image from 1.86 meters that a standard projector needs nearly four meters for.
For events, this has a second, often underestimated advantage: the projector is at the front by the screen instead of behind the audience. No one walks through the light beam, the cable is short, and the fan doesn't hum next to the guests. In tight spaces, this is often the only setup that works at all.
Ultra-short throw with ratios around 0.25 goes a step further, but it places high demands on the surface. Because the light hits at an extremely shallow angle, every ripple in the screen fabric becomes visible as a shadow. This rarely works well on a tripod screen that moves slightly in the wind.
The distance determines the image size, and the image size determines how much light you need. The same amount of light is spread over a larger area, so the image gets darker with every meter of image width.
As a rough guide: in a darkened room, around 2,000 ANSI lumens are sufficient for four square meters of screen area. Outdoors at dusk, you will need 3,000 or more for the same area. An honest assessment of the local lighting conditions will save you more trouble here than any number in a data sheet. You can see which selection of devices with which light output is available for your location in the projector overview, deposit-free and including insurance.
This online calculator uses the exact formula from the data sheet rather than estimated values. The calculation can be performed either via the distance to the screen or the image width, meaning it replaces both distance and image width calculators in one. The image width in meters is derived from the diagonal in inches using a factor of 0.022138, and the distance is then calculated using the throw ratio. The image height is based on a 16:9 aspect ratio, and the viewing distance is based on the rule of thumb of 1.5 to 2.0 times the image width for Full HD and 1.0 to 1.5 times the image width for 4K.
In the second mode, the calculation is reversed: you enter the available distance and get the largest image diagonal that will fit. The four design switches set typical values, and you can use the slider below to set the exact value from your data sheet. If you want to dive deeper into the setup, you will find the practical steps linked in the corresponding guide.
For a standard projector with a throw ratio of 1.5, it is 3.32 meters, because a 100-inch screen is 2.21 meters wide. A short-throw device with a value of 0.7 achieves the same image from 1.55 meters, while a telephoto lens with 2.0 requires 4.43 meters.
With a standard projector, you get an image width of 2.0 meters, or about 90 inches. With a short-throw projector, 4.29 meters of width—and thus about 195 inches—would be possible from the same distance. So, the distance alone tells you nothing without the throw ratio.
In 16:9 format, it measures 266 centimeters in width and 149 centimeters in height, with a diagonal of 305 centimeters. The image area is approximately four square meters.
You divide the measured distance by the measured image width. If you place the projector three meters away and measure an image width of two meters, the ratio is 1.5. This works even without a data sheet; you only need a tape measure and a blank wall.
That depends solely on the throw ratio and the desired image width. A standard device needs just under four meters for 120 inches, while a short-throw projector needs less than two. There is no one-size-fits-all number, which is why the calculator above uses your device's specific values instead of an average.
As far as the zoom range allows. With a throw ratio of 1.48 to 1.62 and 120 inches, that is 3.94 to 4.31 meters; anything beyond that makes the image larger than the screen. A little more distance is not critical if you are willing to project onto the border, but it is cleaner to place the projector within the specified range.
About 30 centimeters is enough for the wall behind the projector to keep the ventilation clear. However, this question usually refers to the distance to the projection surface, which is determined by image width multiplied by the throw ratio.
Technically yes, via keystone correction or lens shift. However, both cost image quality or money. At an event, it is almost always faster to move the tripod by twenty centimeters than to calculate a crooked setup after the fact.
For movies, sports, and modern presentations, 16:9 is the standard today. A 4:3 screen is only worth it if you are primarily showing older documents or spreadsheets. All values on this page apply to 16:9.
No, the optics calculate the same way indoors and outdoors. What changes is the required light output and stability. For setting up in the garden, the guide to garden cinema is helpful, and for the right surface, see the overview of screens.
Plan every detail of your event with our free calculators and configurators. All tools can be used without registration.

Wir haben dir eine Mail geschickt, bitte bestätige sie um den Rabattcode zu erhalten.

