


A photo booth layout, often called a photo booth template, overlay, or print template, is the designed frame around the photo on every printout. It includes names, dates, logos, or a motto and leaves a transparent area where the photo will appear. This refers to the printed frame, not a handheld selfie frame.
Right here on this page, you can design your photo booth frame, for free and without any graphic design software. Start with one of 22 templates or a blank 15 x 10 cm canvas, then add text, colors, graphics, and one to four photo placeholders. To begin, the configurator will ask for an email address, which is where your finished frame will be sent.
From experience: We see the same four mistakes in customer layouts time and again. Use these tips to avoid them from the start.
In three steps: choose a template, customize it, and submit. You can choose from styles for every occasion under "Templates," or start with a blank canvas. Every photo booth template remains fully editable afterward, so a wedding frame can easily be adapted for an anniversary.
In the second step, you personalize the frame. Add names, dates, or hashtags under "Text," or use our pre-set font pairings to take the guesswork out of typography. Under "Elements," you'll find shapes, lines, and motifs ranging from hearts and floral vines to gold accents. You can also upload your own graphics and logos as PNG, JPG, or SVG files via click or drag-and-drop. Color, opacity, outlines, and shadows can be adjusted individually, and you can enter corporate colors directly as hex values.
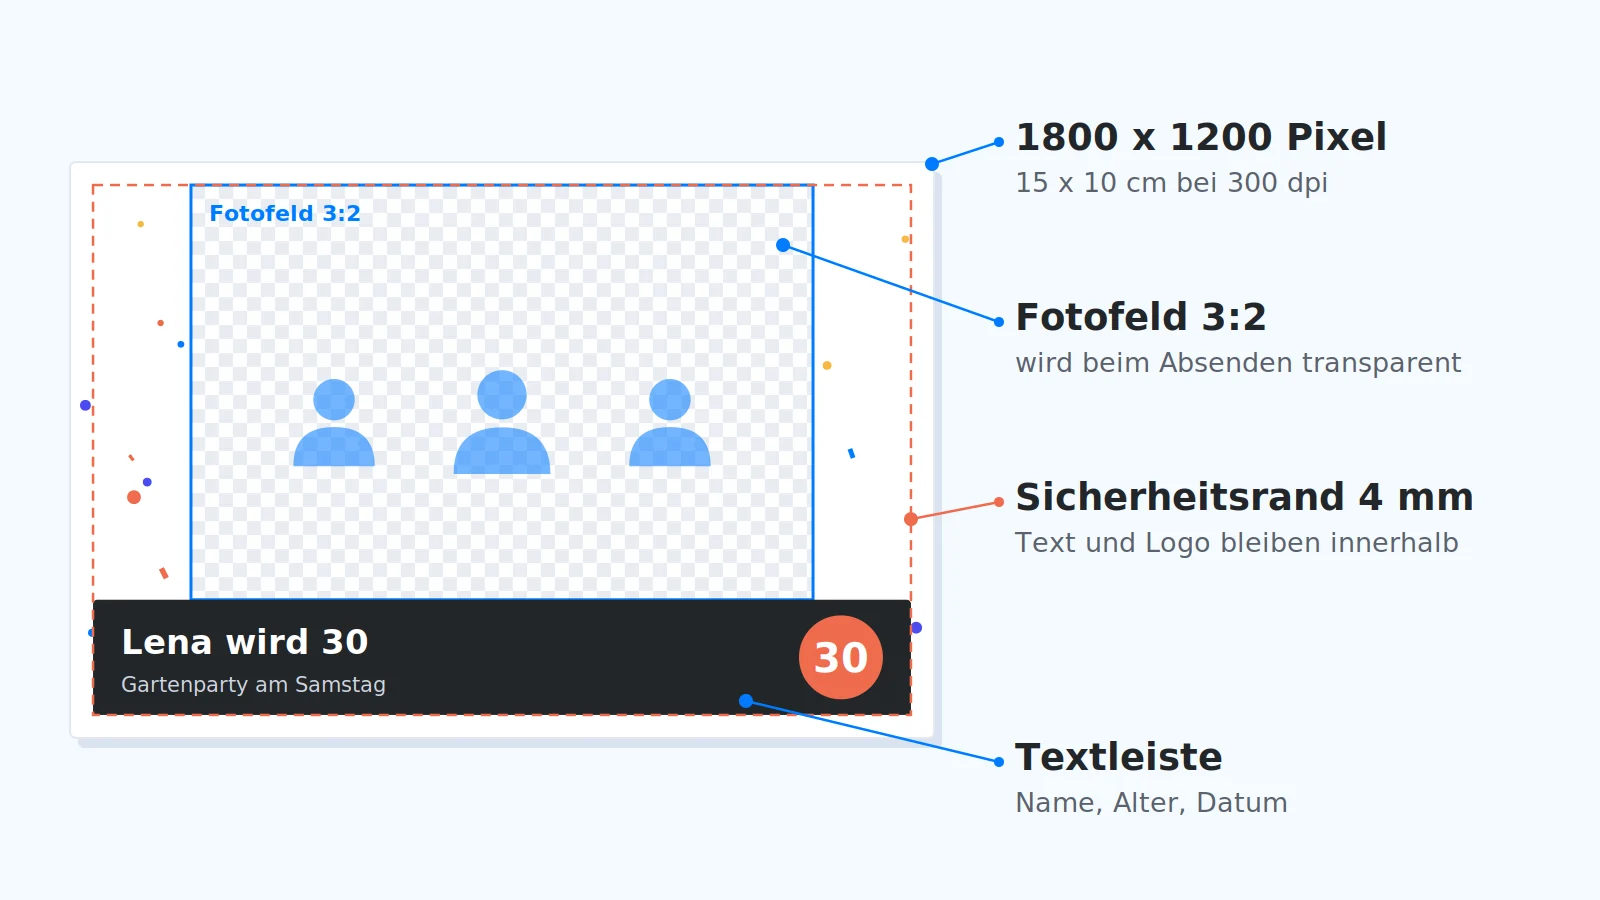
Finally, submit your frame with a single click. All photo placeholders will become transparent, and the configurator will generate a 1800 x 1200 pixel PNG file. The workspace serves as your preview at all times; you'll have more room to work on a laptop or tablet than on a smartphone.
Most templates are designed for weddings, followed by birthdays, corporate events, and seasonal celebrations. There are 22 designs in total, plus a blank canvas intended as a starting point for your own ideas. Styles range from classic to playful. The table shows which photo booth templates belong to which occasion and what they typically include.
Template version date: 09/10/2026. Names and dates in the templates are examples; always remember to overwrite them, including the year.
There are dedicated templates for bachelor/bachelorette parties, baptisms, and graduations, with space for a motto, names, or the year. For tips on props, school logos, and printing for graduation parties, check out our guide on photo booths at graduation parties.
Wedding layouts thrive on names, dates, and fonts with character. Calligraphy or an elegant serif font for the names, paired with floral motifs in green, rose, or gold, are proven favorites. In the "Eleganz" template, the photo is positioned on the left with the names on the right next to a fine gold line, while "Eucalyptus" and "Pampas Boho" are perfect for garden weddings and outdoor ceremonies.
The best color inspiration comes from your invitations and table decorations, making every print feel like a cohesive part of the celebration. Many couples paste the photos into a guest book, so it’s worth choosing a clean, uncluttered frame that won't compete with the handwritten messages. This turns every print into a keepsake that guests can hold onto and take home.

For birthdays, the layout can be a bit bolder. The name and age as a large number is a classic, paired with bright colors, confetti, or balloons. For milestone birthdays, the Black Gold template looks more sophisticated; a black background with gold text works just as well for a 30th as it does for a 60th.
If the party has a motto or theme, include it in the frame; proven ideas include the 80s, Gatsby, or Hawaii. The Tropical Summer Party template with palm leaves and hibiscus is a great start for garden parties. Since large groups often crowd in front of the camera at birthdays, a large photo area is worth considering here.
A photo booth design for companies should follow the corporate design. Upload your logo with a transparent background, enter your corporate colors as hex values, and choose the most similar font from the available pairings instead of your house font. Place the branding in the bottom bar or along the edge—never over faces.
At a trade fair, every print becomes an advertising medium that visitors take home. In addition to a logo and tagline, include the company website or hashtag in the frame so customers remember where the photo was taken later on. For a Christmas party, the Christmas template with the company logo in the bar is a perfect fit.

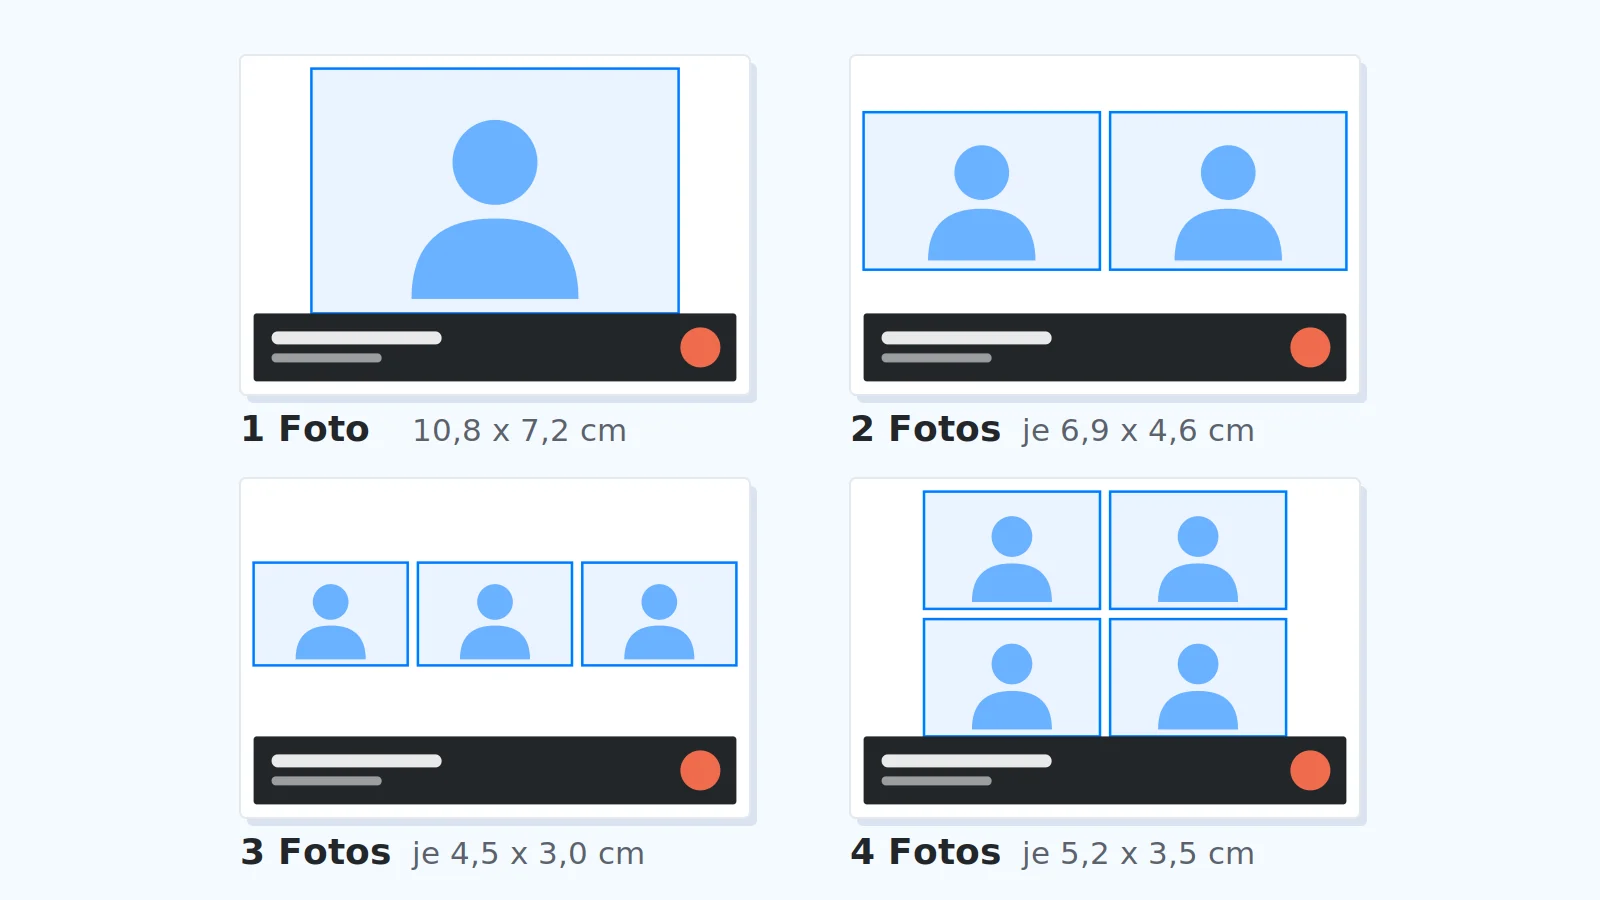
You can fit one to four photos on a photo booth layout. The photo booth fills each placeholder with a separate shot; with multiple placeholders, you get a short series, such as serious, laughing, and making a face. As a rule of thumb: the more images, the smaller the faces will be, so image size is often a more important factor than personal preference.
Calculated for a 15 x 10 cm print with a 4 mm margin, a 2 cm text bar at the bottom, and 3 mm spacing between images. Four images in a grid will be larger than three images in a row.
In addition to landscape format, many are familiar with the classic 5 x 15 cm portrait photo strip with three or four images stacked vertically. The configurator creates 15 x 10 cm landscape layouts; it does not offer a true portrait format. You can recreate the look of a strip by using three placeholders in a row, though a single large photo area remains the best choice for group photos.
For standard printing, a photo booth layout requires 1800 x 1200 pixels at 300 dpi, saved as a PNG with a transparent photo area. This applies to all photo booth layout templates, whether they come from the configurator, Canva, or Photoshop.
These values apply to every layout template, provided you are printing in postcard format.
If you do the math, 15 x 10 cm at 300 dpi comes out to 1772 x 1181 pixels. There is a simple reason for the difference: 10 x 15 cm, the standard postcard format, is the rounded term for 4 x 6 inches, which results in exactly 1800 x 1200 pixels.
Canva offers free photo booth templates, but downloading them with a transparent background is only available in their paid versions. In Photoshop, simply export as a PNG with transparency enabled. If saved as a JPG, the photo area will fill with white, and the image will be hidden behind it.
A good photo booth layout is simple and clearly structured, putting the guests in the spotlight. The most important rule: faces belong in the photo field, text and logos on the edge. The frame provides a stage for the picture; it is not the subject itself.
As a rule of thumb, two fonts and two to three colors from the event—such as from invitations, decorations, or corporate design—are sufficient. In addition to the frame, the background defines the style of the pictures, so it is worth planning both in the same color scheme. White text on light pastel or hair-thin lines will be lost in the print. Colors usually appear slightly darker on the print than on the screen, so dark areas can be one shade lighter.
Designing it yourself is enough if names, dates, and a suitable template are sufficient. Having it designed for you is worth it if the photo booth corporate design needs to be exact or if there is no time before the event. The second option is the individual photo layout as a service: you send your logo, colors, or a rough draft, and the design team creates the frame from it and coordinates it with you before the event.
This service is included with the Fotobox Print Pro. The layout appears on every print from the Fotobox Print and Print Pro; send your frame for this at least one day before the event. If you pick up the box, the frame will already be installed. Upon request, a service employee can deliver the box and set up the layout on-site.
The video tutorial for the photo booth shows how the box is set up and operated at the event. Which model suits the number of guests and print volume can be found in the overview of photo booths with instant printing, deposit-free and with all-risk insurance from Renty.
Yes. The configurator on this page and all 22 photo booth templates are free; no booking is necessary. You only need an email address to which the finished frame will be sent.
Free, yes; without an email address, no. There is no direct download in the browser; after submitting, you will receive the frame by email as a PNG file with a transparent photo field.
1800 x 1200 pixels at 300 dpi, which corresponds to a postcard-sized print of 15 x 10 cm. The photo field has a 3:2 aspect ratio; important elements should be kept 4 mm away from the edge.
Yes, via upload as a PNG, JPG, or SVG. A file with a transparent background looks cleanest; a JPG will include a white box in the layout.
In many cases, yes, because the file is a PNG with a transparent photo field, just as photo booth programs use for print templates and overlays. Check beforehand whether your program expects 1800 x 1200 pixels and how it assigns multiple photo fields.
At the latest one day before the event, the frame will already be on the box when you pick it up. If you have the layout designed for you, plan for a little more time, as the draft will be coordinated beforehand.
Plan every detail of your event with our free calculators and configurators. All tools can be used without registration.

Wir haben dir eine Mail geschickt, bitte bestätige sie um den Rabattcode zu erhalten.

